Wednesday, July 15, 2026

How to sort a view by multiple columns (user personal view)

A system view can be sorted by multiple columns and published. However the user is stuck with this, unless you know this trick. Read on!

Consider you are on the Accounts list and you want to sort the list based on Address 1: City first and then by the Account Name field.
  • Click on Address 1: City header column and sort based on your preference (A-Z or Z-A).
  • Now hold the Shift key on the keyboard and then click on the Account Name header column and sort based on your preference.
  • If you want to add another column to this list, continue holding the Shift key and click on the 3rd column header and sort it.
Hope this helps!

How to enable In-App Notification in Dynamics 365 CE

In-app notifications allow Dynamics 365 users to receive contextual messages directly within a model-driven app such as Dynamics 365 Sales, Customer Service, or Field Service.

In-App notifications in Dynamics 365
Notifications can appear as:

  • Toast notifications on the right side of the application.

  • Notification centre messages accessed through the bell icon.

Notifications remain in the notification centre until the user dismisses them or they expire. The default expiry period is 14 days, although this can be changed when the notification is created.

How to Enable In-App Notifications

The feature must be enabled separately for each model-driven app.

  1. Go to make.powerapps.com.

  2. Open the solution containing the model-driven app.

  3. Select the app and choose Edit.

  4. Open Settings.

  5. Select Features.

  6. Enable In-app notifications.

  7. Save and publish the app.

The notification setting is stored at the individual model-driven app level.

How Notifications Are Created

Notifications can be generated using:

  • Power Automate.

  • JavaScript or the Dataverse Web API.

  • A plug-in or custom integration.

  • The Dataverse SendAppNotification action.

  • Direct creation of records in the Notification table.

Notifications created through SendAppNotification are stored in the Dataverse Notification table, with the logical name appnotification.

Required Security Privileges

There are 4 tables to keep in mind so notifications work smoothly.

  • Notification (appnotification): This is where notifications are stored.

  • Model-Driven App User Setting (appusersetting): The table stores app-specific settings and preferences for each user.
  • Setting Definition (settingdefinition): This table contains the definition of notification-related settings that the model-driven app reads. The user needs Read and Append To privileges because the Model-driven App User Setting record references the relevant Setting Definition record.
  • Send In-App Notification (prvSendAppNotification): To send notifications to others.

Assign the following Privileges


Notification

  • Create, Read and Delete
  • The close or cross button deletes the individual appnotification record. Without Delete access, users may see the close button but be unable to dismiss individual notifications.
  • You may give User, BU or ORG level depending on the access you want to assign.

Model-driven App User Setting

  • Create, Read, Write and Append.

  • These are ORG level access.


Setting Definition

  • Read and Append To

  • These are ORG level access.


Send In-App Notification

  • ORG level access under Miscellaneous privileges tab.

These privileges allow the notification bell, notification centre and user notification settings to work correctly.

To sse “Dismiss All”, the user requires:

  • Model-driven App User Setting

  • Setting Definition

Dismiss All does not immediately delete every notification record. It updates the user setting so that older notifications are no longer retrieved.

Hope this helps!

Thursday, February 19, 2026

Field Service pricing vs ERP pricing: How to turn off the Clash

In Dynamics 365 Field Service, pricing and cost can be calculated by Field Service itself (using features like price lists, products, services, agreement pricing, etc. within Field Service). However if you'd like, you can always disable it.

This happened in one of our environments that a solution dependency was created. When I looked, there was a solution installed with the name: msdyn_FieldServiceDisablePricingComponents

I tried looking at sources from where I can download and install this solution. However, this simple setting in Field Service solves it.

When people say “install the Field Service Disable Pricing Components solution”, they’re usually referring to a built-in capability controlled by Field Service Settings, not a separate managed solution you import into Dataverse.

The practical outcome:
  • Field Service stops calculating price and/or cost
  • Another system becomes the source of truth (e.g., Project Operations, Finance & Operations, or an ERP)

Prerequisites


Before you change settings, make sure you have:
  • Administrator rights to the Power Platform environment (System Administrator / Field Service Admin equivalent).
  • Dynamics 365 Field Service installed in the environment.
  • Access to the Field Service app and the Settings area.

Step-by-step: Disable pricing components


Step 1: Sign in
  • Open the browser.
  • Sign in to your Dynamics 365 Field Service instance.

Step 2: Open Field Service Settings
  • Go to the Field Service app.
  • In the sitemap (left navigation), switch to Settings (typically near the bottom).
  • Under General, select Field Service Settings.

Step 3: Change Work Order / Booking pricing options
  • Open the Work Order / Booking tab.
  • Update these settings:
    • Calculate Price = No
    • Calculate Cost = No
  • Select Save & Close.
That’s it—Field Service will stop calculating those values internally.

Tuesday, January 20, 2026

Find what’s hiding a field in Dynamics 365: Step-by-Step with PowerApps Live Monitor

A Little Background


A field (msdyn_customergroupid / Customer Group) exists in Dataverse for the Account table, but it is not showing on the Account form in a Dynamics 365 model-driven app. Our requirement was to show this on the form and I know that we had made it visible on the Account form.

However, after a deployment we noticed that it wasn't the case. Now it could be because on various reasons:
  • The field is hidden on the form level.
  • Column security profile was implemented.
  • There is a business rule, due to which it was hidden.
  • There is a script, due to which the field was hidden.


Our Approach


The easiest way to rule out the problem is to start with the simplest reason and work your way up.

Step 1 - To check if field was hidden on the form


We checked if the field was hidden on the form? It wasn't. That was easy.

Now, to check Business Rules and Script was a hard road for us because we had 20+ rules and many functions written on form load.

Step 2 - Run quick form-runtime checks (console logic)


We used simple client checks to classify the problem.
This is the fastest way to know whether you’re dealing with design-time vs runtime.
Click F12 > Console and run these commands:

Xrm.Page.getControl("msdyn_customergroupid")
If the call returns null, the field is not on the form. For us, tt returned the Control means something must be hiding it.

Xrm.Page.getControl("msdyn_customergroupid").getVisible()
If it returns a control, something must be hiding it. We ran the below command to confirm:
It returned FALSE.

Step 3 - Use PowerApps Live monitor to capture the visibility change


When I opened the PowerApps Live Monitor and performed the steps within the App, I captured a Live monitor event:
  • dataSource: Forms.FormChecker.ControlStateChange
  • controlName: msdyn_customergroupid
  • visible before: true
  • visible after: false

And the call stack included:
  • M.setVisible(...)
  • pbl_c3f86e4e73b7ed1183ff6045bd8c93df(...)
  • Mscrm.BusinessRulesScript.Initialize(...)


Key Finding:


The field was initially visible, then explicitly hidden at runtime by a business rule script.
This pattern indicates the visibility change came from a Business Rule (Power Apps compiles business rules into runtime scripts, commonly visible as pbl_<guid> style functions).

So we could say with confidence:

✅ A Business Rule running on the Account form hid Customer Group by calling setVisible(false).
✅ Not JavaScript web resources. Not security. Not form XML missing. Not personalization.
✅ Focused our attention to look at all the business rules and we could find the culprit.

Hope this helps!

Thursday, December 25, 2025

Dual-write | Initial Sync for newly added Legal Entities in Dual-write (D365 F&O → Dataverse)

Dual write initial sync
When you add a new legal entity in a Dual-write enabled environment, this checkbox decides whether
you want to sync data for the newly added legal entity.

Also, without impacting existing legal entities.


The Core Concept


The checkbox "Skip initial write for newly added legal entities" controls whether an initial sync (initial write) is triggered from Dynamics 365 FO to Dataverse when a new legal entity is added.

Two possible behaviors:


1) Checkbox is checked
  • Initial sync is skipped
  • No data is written automatically for that legal entity
  • You must manually trigger syncs later

2) Checkbox is unchecked (recommended for initial sync)
  • Initial sync runs automatically
  • Sync applies only to the newly added legal entity
  • Existing legal entities are not reprocessed
  • Better performance and cleaner execution

👉 Bottom line:
Unchecking this box is the correct and safest way to run an initial sync only for the new legal entity.


When To Use This


A common real-life scenario:
  • Dual-write is already running and live with other legal entities.
  • A new company / legal entity is introduced later.
  • You want data to sync only for the new entity, without disturbing production data.

Step-by-Step: Perform Initial Sync for a New Legal Entity


Step 1: Open Dual-write

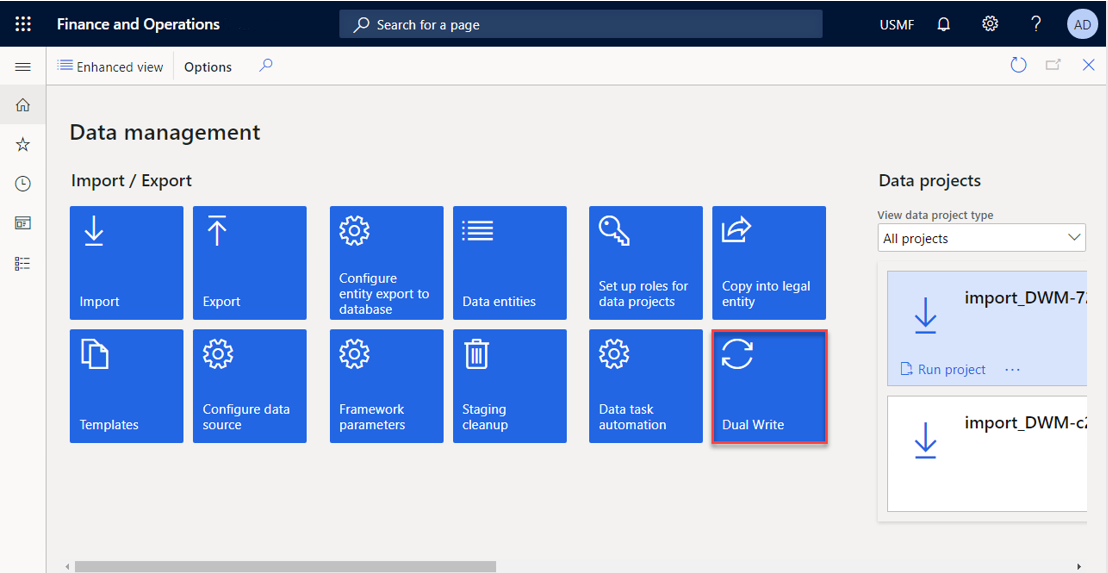
Navigate to: Workspaces → Data management → Dual-write

Data management


Step 2: Open Environment Details

Click Environment details from the Dual-write workspace.

Environment Details


Step 3: Go to Legal Entities

Select Legal Entities to view the list of companies enabled for Dual-write.


Dual Write Legal Entities

Step 4: Add the New Legal Entity

  • Click Add Legal Entity.
  • ❌ Uncheck: Skip initial writes for newly added legal entities
  • Click Save


Step 5: Confirm Sync Completion

  • Once the system finishes syncing table maps, you’ll see: Legal entities updated successfully!

This confirms the initial write has been triggered only for the new legal entity.


What Happens Behind the Scenes

  • Dual-write runs initial write only for the new legal entity.
  • Existing legal entities are untouched.
  • No historical reprocessing.
  • No performance degradation.
  • Table maps are reused automatically.
  • Makes incremental rollout safe.

Hope this helps!

Sunday, September 28, 2025

D365 Sales | Showing auto-charges generated in F&O within CE via Dual-write

We recently had a requirement that charges applied in F&O, must be visible in CE. When we checked the dual-write table, there was a standard mapping between

ORDER TOTAL CHARGE AMOUNT (F&O) > FREIGHT AMOUNT (CE)

dual write mapping for sales order header

As we know that we can setup auto-charges in F&O (well, now you know in case you didn't) and when a sales order is created, the charge can be applied on the sales order. To do so we had to click on the Tiered Charges button.

Apply tiered charges (F&O)

This would apply the charges in F&O, but the charges weren't pushed into CE, until we click on the "Push prices and totals" button. This would then push the prices into CE under the Freight Amount field.


Push prices and totals (F&O)

I just wanted to quickly pen this down for you, if you're trying to figure this out.

Hope this helps!

Sunday, February 9, 2025

Understanding Dual Write in Dynamics 365: A seamless data integration approach

dual write image
New to dual write? Here's where you should start from. This isn't a deep-dive into this new capability from Microsoft, but the first step for you to understand the key differences between noth Dynamics 365 CE and F&O and why was this required.

What is Dual Write?

Dual Write is an out-of-the-box infrastructure that ensures data consistency between customer engagement apps (CE) and finance and operations (F&O) apps.

Customer engagement apps, such as Dynamics 365 Sales and Customer Service, focus on managing customer relationships, sales, and marketing interactions. These are process driven and can tailor to your customer's needs and business processes.

On the other hand, finance and operations apps, like Dynamics 365 Finance and Supply Chain Management, handle back-office functions such as financial transactions, inventory, and supply chain operations. These are more rigid applications because they fulfil a certain purpose and cannot be customized to the extent that a front-office app can be.

Historically, these two areas operated in silos, leading to data duplication and inefficiencies. Dual Write was introduced to bridge this gap, ensuring real-time data flow between the front office and back office, enabling businesses to operate with a unified and accurate data set across departments.

Key Benefits of Dual Write

  • Seamless Data Synchronization – Ensures that customer, product, and financial data remain consistent across systems.
  • Enhanced Business Processes – Provides a unified experience across sales, customer service, supply chain, and financial management.
  • Real-Time Updates – Improves decision-making by reducing latency in data updates.
  • Reduced Customization Efforts – Eliminates the need for complex custom integrations.
  • Improved Customer Experience – Ensures that all teams have access to up-to-date customer information, leading to better service.

Use Cases of Dual Write

  • Customer Data Management: Keep customer records synchronized between CRM (D365 CE) and ERP (D365 F&O), ensuring all departments have access to accurate information.
  • Product and Pricing Updates: Synchronize product catalogs and pricing details across sales, e-commerce, and finance platforms.
  • Order Processing & Invoicing: Automatically sync order details and financial transactions across systems to streamline the order-to-cash cycle.
  • Inventory & Supply Chain Management: Ensure accurate stock levels, purchase orders, and logistics data across finance and operations teams.

Technical Considerations

  • Customization and Extensibility: Dual Write supports custom tables and extensions, allowing businesses to tailor integrations to their needs.
  • Data Security & Compliance: Ensure that data policies and governance are in place to comply with industry regulations.
  • Performance Monitoring: Regular monitoring and performance tuning can help prevent sync failures and maintain optimal system performance.
  • Error Handling & Troubleshooting: Implement robust error logging and resolution mechanisms to address data conflicts or sync issues.
In conclusion, I see this as a game-changer for businesses using Dynamics 365. By using this organizations can achieve real-time data consistency and reduce costs. As companies adopt digital transformation strategies, dual write becomes a key enabler for a unified and connected enterprise.

Friday, December 20, 2024

Microsoft Planner | Comments not visible in Planner [SOLVED]

A little something I noticed while using Microsoft Planner. Thought to bring it up.

I recently created a plan and started updating tasks under the plan. Now I wanted to comment certain updates on the tasks and noticed there was no comments section in the task.

This got me thinking, something that I was able to do earlier seems to be missing now.


When we create a Plan using Microsoft Planner, i.e., navigating to https://planner.cloud.microsoft/, and create a new task under the plan, the comments section isn't visible.

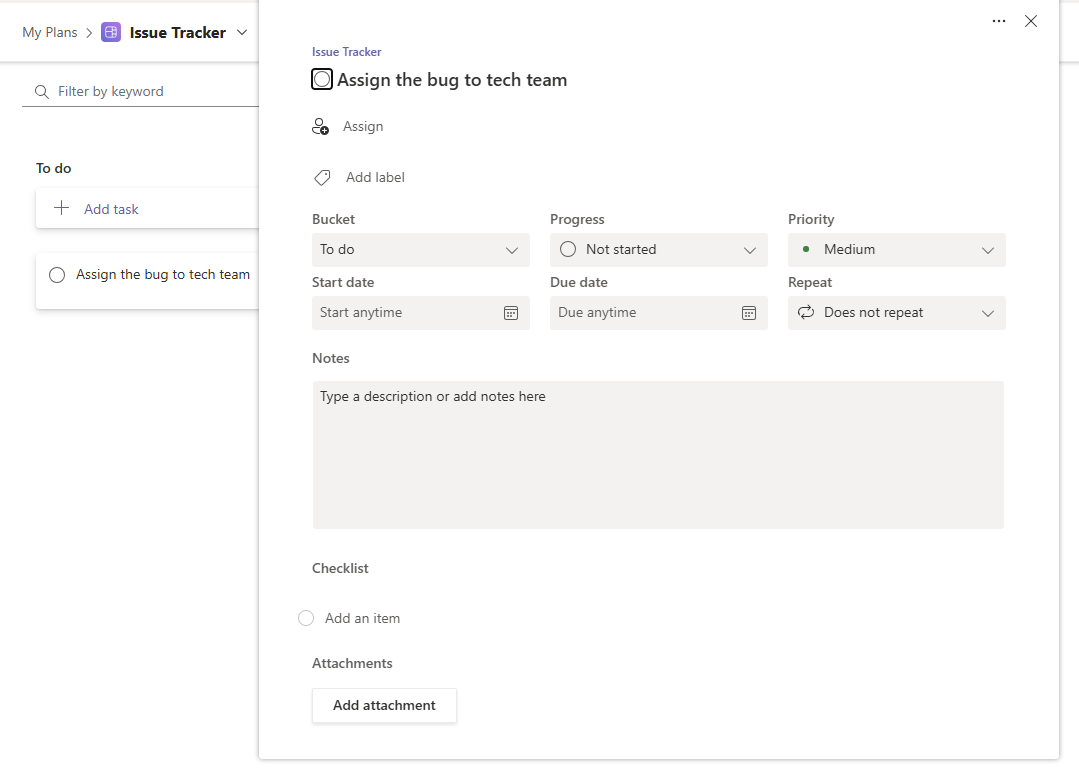
MS Planner Task - No Comments
However, when you create a Team / Channel in MS Teams and create a plan under the Team, now you can add comments to the task.

MS Planner Task - With Comments

Just a little something that you might want to keep in mind if you want to keep ongoing conversations around a task between team members.

Sunday, September 15, 2024

D365CE | Alternative to Input Mask PCF control

It's been quite a while since the input mask PCF control has been retired in Dynamics 365 CE.

I recently had to implement a mask on phone number fields and was disappointed to learn that Microsoft had retired the control and hasn't offered any alternatives.

So I had to look for other options and I came across this Check Phone Number PCF control which I found it to be very comprehensive. You can read the full documentation on github.

Steps and options to configure

  • Once you download and import the solution, you can select the field on which you want to enable the component.
  • The Output format helps you transform to the following:
    • International: +91 87855 85545
    • National: 87855 85545
    • E164: +918785585545
Note: I prefer the E164 format. Sure it isn't readable, but it is easier during search because it is impossible to remember the correct format for all the country codes. Having said that, it depends if you're implementing this for only a particular country, then an International or National format could work better for you.
  • You can setup the default country code. When you enter the number without any code, a default country code is automatically setup.
  • You can also setup a list of allowed and excluded country codes. To setup the allowed country codes, you can follow the list here or check the screenshot for an example: ISO 3166 (alpha 2) country codes needs to be used.
  • You can also specify whether you want to phone call button to be shown and which app must be the default calling app.

Here are some sample numbers I have entered for UAE, Italy and India.


Hope this helps!

Wednesday, June 19, 2024

All about Addresses in Dynamics 365

We had a requirement regarding addresses that had to be addressed in Dynamics 365 CE. I thought to share it.

Requirements

  • To be able to select the following fields as a dropdown, preferably a lookup. Fields: District, City and Country because the District and City list may continue to expand in the future.
  • To be able to add multiple addresses against the Account. 2 or more.
  • In case we need to update an address, there must be a provision in the Address table to select the District, City and Country as well. i.e., these fields must be available in the Address table as lookup fields.
These requirements sound simple to implement, however the address entity lacks flexibility due to which we had to think of a workaround.

Things I have learnt about Addresses

  1. On the Account we can add maximum 2 addresses. Address 1 and Address 2. Let's call this embedded address. If we need to add a 3rd address related to an account, we need to create a new address record (in the related system Address table).
  2. While the Country and State fields are available, these are text fields in the embedded address and related system address table.
  3. The related address table is non-customizable. We cannot add additional lookup fields in that entity.
  4. When an Account or Contact record is created, blank Address records are automatically created and linked to the Account (or Contact). These are associated with the embedded address records and are numbered as "addressnumber" 1 and 2. addressnumber 1 represents invoice address and 2 represents delivery address by default.
  5. The system Address tables don't have lookup to Account or Contact. The relationship is identified by 2 fields namely, "objecttypecode" and "parentid". objecttypecode recoginzes if this related address is linked to "Account" or "Contact" and parentid is the actual GUID value of the Account or Contact.

Workaround to address the limitations

Since the system Address entity is linked and tightly integrated in Dynamics 365 CE, we couldn't replace the system Address table with new custom Address table. I am saying this because, system Address primarily linked to Account and Contact, but when we update the address on Lead and qualify it, the embedded Address and correspondingly the system Address records are also updated. Also, indirectly linked with Opportunities, Quotes and beyond. If you're considering dual write integration with Dynamics 365 F&O, these are again tightly integrated there.

Having analyzed this, we went ahead with a custom Address entity but ensured we are keeping the system Address entity records in sync as well.

What did we do?
  1. We created 3 custom lookup fields called District, City and Country on the Lead, Account and Contact tables for easy data entry from users perspective. When the user selects these fields, we populate the OOB District, State and Country text fields and those are automatically updated in the related system address records.
  2. We introduced a custom address entity and ensured the user uses this for their data entry and viewing. When the user updates the embedded address, we also need to create custom address records related to Account.
  3. When the custom address records are updated, we need to update the related system address entity records.
  4. When a new custom address is created, we create a related system address entity record and link it with the respect Account by updating the objecttypecode and parentid.
  5. When the custom address is deleted, we need to also delete the related system address record and update the embedded addresses if the addressnumber matches. By update I mean we had to clear the values in the embedded address fields on the Account record.
  6. For the most part we can treat system Addresses as a target only, as they are a copy of the custom Address entity data. We can set up a business process and data entry process in such a way that system addresses are not updated, however, if some process we don’t know about updates a system Address, it needs to get reflected up to the custom Address as well.
Hope that helps!

Saturday, March 30, 2024

D365 CE | Identify and clean up storage space

Accumulation of data over time can lead to storage issues that in turn impacts system performance in Dynamics 365 Customer Engagement (CE). If you're receiving constant notifications, it means you are reaching the capacity limits or already over capacity.

Here's how you can analyze the database capacity usage and steps you can follow to clean up the data using Power Platform, Bulk Record Deletion and Advanced Find.

Check Database Capacity

Here are the steps:

  • To check database capacity navigate to Power Platform Admin Center.
  • Click on Resources > Capacity. This takes you to the summary page that shows you the overall database usage and percentage available / over. In this case you can see that the Log is much over capacity. So let's see what do these Logs contain.


  • If you click on Dataverse located across  the page as a tab next to Summary, you can see all the Environments and usage based on area like Database, File or Log storage.
  • Click on the chart icon to see the details.


  • Here you can see based on the area and tables that are occupying the most storage. In the below image you can see how the Log usage for table AuditBase has been growing exponentially.
So let's delete the Audit Logs and follow other methods to delete data from specific tables.


Free up storage capacity

  • To do so, navigate to Power Platform Admin Center and click on the Environments.
  • Select the Environment for which we need to delete the audit logs.


  • Select Delete Audit Logs. You can also setup how long you want to retain the logs for for automatic ongoing maintenance.


  • A window will pop-up from the right where one can select appropriate action.


Note: The system can take up to 24 hours to update storage information. It is recommended to wait up to 24 hours and monitor your storage.

This is one of the methods you can use to free up storage space.
  • Similarly you can delete PluginTraceLogs (Advanced Settings > Settings > PlugIn Trace Logs).
  • WorkflowBase


  • Notes with attachments.


Hope this helps!

Tuesday, March 19, 2024

D365 CE | Preferred solution in Dataverse

Interesting concept that I recently came across is to "Set your Preferred Solution" in Dataverse.

By default if you do any unmanaged customizations in PowerApps Maker, are created under the default solution. The drawback is if I add a new field, instead of using the prefix for the solution that I have created, it would use the Common Data Service Default Solution prefix (i.e., new_ or cr_).

Microsoft has now provided an option to setup your preferred solution, so any customization you perform even outside your custom solution will automatically be added under your custom solution. To do so, we need to setup the custom solution as a Preferred Solution.

Here are the steps:

  • When you login to PowerApps Maker, you can see there is an option to select the preferred solution.
  • Click on Manage or click Set preferred solution.

Set up preferred solution in Dynamics 365 CE PowerApps Maker

  • Select the solution from the dropdown or create a new solution.
select the preferred solution from the dropdown list

  • Once the preferred solution has been setup, you can test by going to the default solution and creating a new field or updating the character limit of an existing field. You will notice that the changes are automatically reflect in the preferred solution too.


Hope it helps!

Monday, March 11, 2024

How to use Power Query in Excel and connect to D365 CE (Part 1: Legacy)

Power Query is a robust tool that can be used to connect to the online services (like, Dynamics 365, SharePoint Online, Azure SQL DB, etc.) 

Below are the steps to connect to D365 CE:

  • Open Excel
  • Click Data > Get Data > From Online Services > From Dynamics 365 (online)
Get data in excel from Dynamics 365 CE
  • Go to Advanced Settings in Dynamics 365 CE.
Advanced Settings to access classic settings in D365
  • Select Customizations > Developer Resources
  • Fetch Web API URL from developer resources.
Web API URL
  • Enter in the dialog box (this is a legacy connector)
D365 Online legacy connector
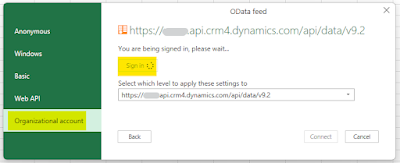
  • Click Organization Account and Sign in
Sign in to connector
  • Once sign in is successful, click Connect.
  • The Navigator will show all the tables that one can use to develop pivot tables, pivot charts etc.
  • Select one or multiple tables that you want to use and transform and load the data into Excel.
Here are the steps to use the Dataverse connector.

Hope it helps!


How to use Power Query in Excel and connect to D365 CE (Part 2: Dataverse connector)

Microsoft has a released a new way to connect to Dynamics 365 via the Dataverse connector. To use the dataverse connector follow these steps:
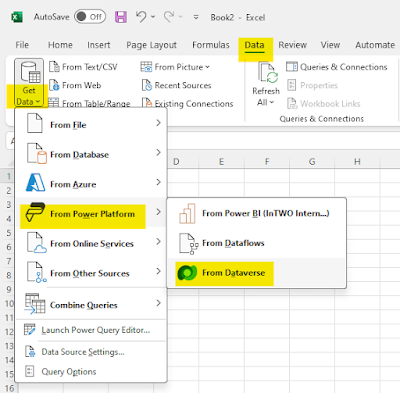
  • Open Excel > Data > Get Data > From Power Platform > From Dataverse
Dataverse connector in Excel

  • Login using the user who has access to the data.
  • Select one or multiple tables as required.
  • Transform and Load data.
Hope it helps!

Saturday, February 17, 2024

Solved – Power Automate: Cannot write more bytes to the buffer than the configured maximum buffer size: 104857600

We had designed a power automate flow and used the List rows action step. While running the flow, we received the below error.

BadRequest. Http request failed as there is an error: 'Cannot write more bytes to the buffer than the configured maximum buffer size: 104857600.'.

Screenshot of the error below.

Cannot write more bytes to the buffer than the configured maximum buffer size

This happens because there is a 100 MB Message Size limits in Power Automate.

Solution

  • Allow Chunking if it is supported by the action.
Allow chunking in power automate
  • Or be specific with the columns you want to return. In the List Rows action, update the Select columns to limit the data returned.
  • Temporarily update the data in the system so that fewer rows are returned. For example, if your condition is to return all the rows where field_name does not contain data. Say this is return 5000 rows. Now update few rows with some sample data and run the flow so that it returns limited rows for processing. (This is not recommended in production, but could be a quick fix if the client agrees to it).
Hope this helps!

Wednesday, December 13, 2023

Dual-Write | Update the Delivery Address in Sales Order from D365 Sales to F&O

We have Dual-Write enabled in one of our customer sites and we are syncing sales orders from D365 Sales to D365 F&O. The issue that we were facing is, when we update the delivery address in D365 Sales, i.e., on Order form (in CE), we have a field called "Choose Ship to Address", while the address is updated on the Order form (in CE), it doesn't update the delivery address in D365 F&O Sales Order form.

Note: for the Address integration to work via dual-write, you need to enable GAB (Global Address Book) app.

After some R&D, we cracked it.

We wrote a workflow to update the Delivery Address Location ID based on the address selected in the field "Choose Ship to Address".

Note: Delivery Address Location ID is also a field on the Order form in D365 Sales. By default you can see that under the Integration tab.

D365 CE Sales Order form

Below is the screenshot of the workflow that was created. Workflow to be created on the Order table and the trigger is when Choose Ship to Address is updated.

Steps:
Condition: if Choose Ship to Address contains data
Update: Delivery Address Location ID (Order) = Location ID (Address)


I am not mentioning the Dual-Write table maps here, but we were using OOB tables maps on the Order table. In case you have updated with custom table maps, you may want to check it (in case the address is still not updating).

Hope this helps!

Tuesday, October 17, 2023

Troubleshoot Dual-Write Issues in Dataverse and F&O Apps

I have written couple of articles on Dual-Write lately. Mostly on issues that we've been facing lately and how we have come to fix them. These post is where I bring them all together. You can think of this blog post as a summary of all the issues and fixes until now and will continue to update the same in the future.

Also certain topics don't need a separate post. Will write about them here directly. Starting below with the posts that I have written previously.

Previous Posts


Unable to create a Quote in Dynamics 365 Sales App

This was because we were receiving an error

"Write failed for entity CDS sales quotation header with unknown exception - BOX API can't be used from non-interactive sessions."

 Click here to read the post.


Privileges required for dual-write initial sync

There are certain security roles and privileges required to perform initial sync of tables via dual-write.

Click here to read the post.


Unable to delete postal addresses in Dynamics 365 Sales

This happened because there were related records, and I wasn't able to delete them too.

Click here to read the post.


Unable to create an order from a quote in Dynamics 365 Sales App

Here is the precise error that I was receiving.

"Write failed for entity CDS sales order lines V2 with unknown exception - Inventory dimension Site is mandatory and must consequently be specified.\nUpdate has been canceled."

Click here to read the post.


Other Issues


Unable to load the dual-write module in a Finance and Operations App

If you're unable to open Dual-write page by selecting the Dual Write tile in the Data management workspace, most likely data integration service is probably down.

For this you would need to create a MS support ticket and request a restart of the data integration service.

Wednesday, September 27, 2023

Unable to update Order Product using Workflows in D365 CE

Here is a note for y'all, something to keep in mind when working with workflows in Dynamics 365 Customer Engagement (D365 CE).

You can create a workflow (i.e., initiate a workflow) on the following tables:
  • Opportunity Product
  • Quote Product
  • Order Product
But when you add a step to Update record within the workflow, you'll notice that you cannot update the above mentioned tables (entities). You can however update any of the related tables linked with these tables.

Add Price List Items too into the above mix. Can create a workflow based on this table, but cannot update Price List Item record using a workflow step.

I believe the workaround would be to use Power Automate flows instead of Workflows. I haven't tried this as yet, but I believe it is possible.

Hope it helps!

Thursday, August 17, 2023

Dual-Write | Unable to create Order from Quote in D365 CE Sales

While converting a Quote into an Order in D365 CE Sales, I was receiving an error message that went like:

Dual Write core application error-Dual Write core application error-Unable to write to Finance and Operations apps due to following error(s): {"Write failed for entity CDS sales order lines V2 with unknown exception - Inventory dimension Site is mandatory and must consequently be specified.\nUpdate has been canceled."} Please rectify your data and try again. If issue persists after multiple retries, please contact your system administrator.

Since dual write is seamless integration and data synchronization across D365CE and D365FO and as the default shipping site and warehouse is required while creating the Order in F&O, we need to ensure that the value is populated prior to creating the Sakes Order. 

Solution

While encountering an error can be frustrating, the good news is that there is a solution.

In this case, the remedy involves performing relationship mapping between the Quote and Order entities. Relationship mapping essentially defines how data is transferred between related entities.

Steps:

  • Open the solution in D365 Sales App. Ensure you've added the following components:
    • Quote and Order tables
    • 1:N relationship between Quote and Order
  • Open the relationship and click on Relationship Mapping
  • Add a new Map and select Default Shipping Site and Default Shipping Warehouse.
  • Now try to convert the Quote into an Order.
It should be smooth sailing now.

Hope that helps!

Friday, August 11, 2023

Error when qualifying Lead into Opportunity | D365 Sales

There could be many reasons and most of it could be found when you perform an online search, but none of those suggestions fixed my issue. When I was qualifying the Lead into an Opportunity, it is showing the following error:

OrganizationServiceFault

And that is it. No other details about the error. No error log, not description of the error, no error code. Nothing!

Resolution

My user didn't have system administrator, but a custom role was assigned to the user. I took some help from my technical team who did a little bit of digging and came across this below message.

Entered Microsoft.Dynamics.SCMExtended.Plugins.Plugins.LeadPrimaryContactPostCreate.Execute(), Correlation Id: 021c0dc2-3e1e-46e5-81c0-b1524ae09ed2, Initiating User: e7925424-1da4-ed11-aad1-002248a13b63

Exception: System.ServiceModel.FaultException`1[Microsoft.Xrm.Sdk.OrganizationServiceFault]: Principal user (Id=xxxx5424-xxxx-ed11-xxxx-002248a1xxxx, type=8, roleCount=4, privilegeCount=1064, accessMode=0, MetadataCachePrivilegesCount=9751, businessUnitId=0b2c4b59-0e31-ee11-bdf4-000d3aba3d29), is missing prvReadSolution privilege (Id=b64e92c8-5d2a-4052-a026-1b73eff9cebf) on OTC=7100 for entity 'solution' (LocalizedName='Solution').

I provided a Read privilege to Solution table under; relevant Security Role > Customization > Solution, and it worked.

Hope it helps!