Sunday, September 20, 2026

Dynamics 365 is slow: Find the bottleneck with Live Monitor and Application Insights

Tracing Dynamics 365 performance bottlenecks with Live Monitor

“Adding one sales-order line takes 20 seconds.”

That description tells us there is a problem, but it does not tell us where the problem is.

That's the consequence, but not the cause.

Those 20 seconds could be consumed by:

  • Form JavaScript
  • A browser or network delay
  • A Dataverse request
  • A synchronous plug-in
  • Repeated SDK operations
  • An external service called by a plug-in
  • Several individually small operations adding up

Without evidence, different teams can spend days investigating their own components without identifying the real bottleneck.

I am not a technical person, but I read through webpages of articles from Microsoft and understood how to go step-by-step into identifying the cause. Here's a simplified process you can start from and go as deep as you wish.

Dynamics 365 and Power Platform provide two tools that help turn a general performance complaint into a traceable investigation:

  • Live Monitor for reproducing and examining an individual session
  • Application Insights for analysing correlated telemetry across users, operations and time

They serve different purposes, but they are most useful when used together.

Live Monitor and Application Insights are not interchangeable

ToolBest used for
Live MonitorReproducing a problem and watching events from one session in real time
Application InsightsAnalysing performance trends, failures and server-side processing across many sessions
Both togetherFollowing a user action from the model-driven app into Dataverse, plug-ins and external dependencies

Live Monitor helps answer:

What happened when this user performed this action?

Application Insights helps answer:

Does this happen repeatedly, who is affected, and which server-side operation is consuming the time?

That distinction provides a useful investigation sequence.

Start with a reproducible scenario

“Dynamics is slow” is too broad to investigate effectively.

Before opening either tool, define a specific action:

  • Opening an opportunity form
  • Saving a work order
  • Adding a sales-order line
  • Loading a dashboard
  • Running a command
  • Changing a field that triggers JavaScript
  • Completing an action that invokes a plug-in or external integration

Record the following information:

  • Environment and application
  • User experiencing the issue
  • Table and form
  • Record used for testing
  • Exact action performed
  • Approximate start time
  • Expected response time
  • Actual response time
  • Whether the issue happens constantly or intermittently
  • Whether other users experience the same behaviour

This information allows the same test to be repeated and makes telemetry much easier to find.

Where possible, compare:

  • Affected and unaffected users
  • Different forms for the same table
  • Different records
  • Different browsers or devices
  • Different geographical locations
  • Customised and minimally customised forms

The comparison often reveals whether the problem is user-specific, data-specific, network-related or linked to a particular customisation.

Step 1: Reproduce the problem with Live Monitor

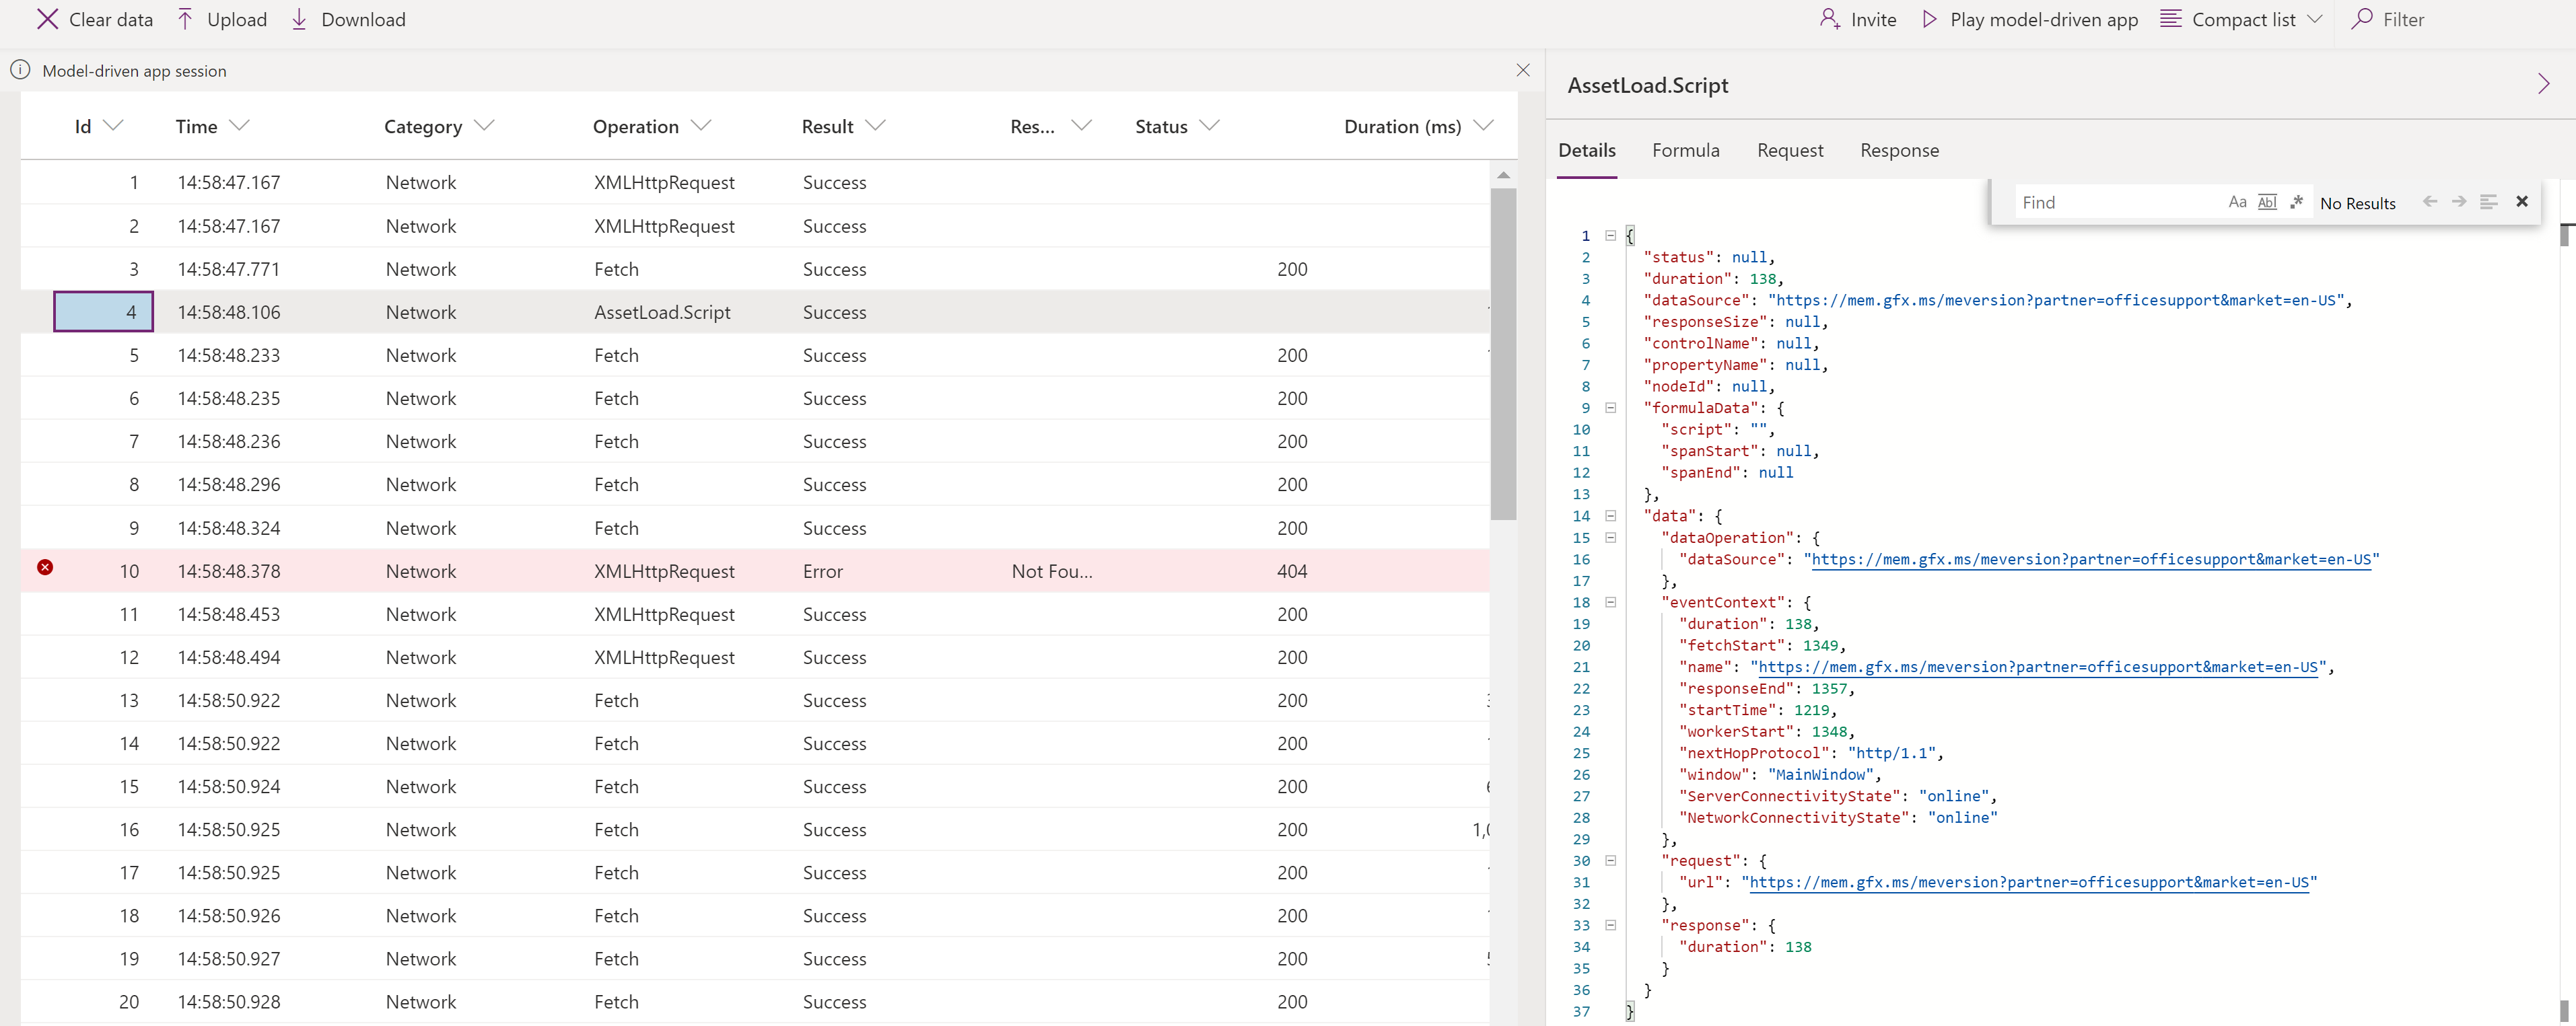
From Power Apps, select the model-driven app and choose Live Monitor from the command bar. You can then launch the app from the monitoring session and reproduce the problem.

Another option is to add &monitor=true to the model-driven app URL and start the monitoring session from the command bar.

Live Monitor records important application activity, including:

  • Page navigation
  • Form loads and saves
  • Command execution
  • Network requests
  • Script errors
  • Form events
  • Performance warnings

Avoid clicking through several unrelated processes during the recording. Start the session, reproduce the specific problem and stop. A focused trace is considerably easier to interpret.

Investigating a slow form load

For page navigation, the FullLoad event represents the complete load of the page. It waits for relevant network requests and rendering to finish before the page is considered ready.

The event includes useful properties such as:

  • Total load duration
  • Form ID
  • Load type
  • Time spent running custom JavaScript
  • Attribution details for custom scripts

The attribution details can identify the publisher, solution, web resource and method associated with JavaScript execution.

This is particularly valuable when a form contains scripts from several solutions. Instead of concluding that “JavaScript is slow,” you can identify which web resource or method is contributing to the delay.

The loadType value also provides context:

  • 0 – First visit to a page type
  • 1 – First visit to a particular configuration
  • 2 – First visit to a particular record
  • 3 – The exact record URL has already been visited

This matters because the first load can behave differently from a previously visited form. Performance comparisons should use similar load conditions.

Investigating network requests

Live Monitor also displays the network requests made while the app is running.

Review the requests around the slow action and look for:

  • One request with an unusually long duration
  • Several sequential requests
  • Repeated calls retrieving the same information
  • Failed requests followed by retries
  • Large responses
  • Requests to external services
  • Synchronous requests that block the interface

A 20-second user experience does not necessarily mean that one server request took 20 seconds.

For example:

ObservationLikely investigation area
Long custom script timeClient-side JavaScript
Fast server response but slow overall requestNetwork, browser queue or download
One slow Dataverse requestServer-side processing
Several repeated SDK callsPlug-in or integration design
Slow external dependencyExternal API or network route
High duration only for certain usersLocation, device or connectivity
Slow duration for every userShared customisation or server-side process

The objective is to identify where the delay begins—not to assign ownership prematurely.

Step 2: Capture the correlation identifier

A Live Monitor event can provide an activity or correlation identifier for the operation.

This identifier is the bridge between the user’s monitored session and the telemetry in Application Insights.

Once you identify the slow request, record:

  • Activity ID
  • Timestamp
  • User
  • Table
  • Operation
  • Duration
  • Any related request or error details

In Application Insights, the following query can be used to find telemetry associated with the activity:

union *
| where operation_Id contains "[ActivityIdHere]"
| order by timestamp asc

This can reconstruct the path through the application and server rather than treating each event as an unrelated log entry.

Step 3: Analyse broader telemetry in Application Insights

Power Platform can export model-driven app and Dataverse telemetry to Application Insights without requiring custom instrumentation code.

The built-in integration can provide telemetry for:

  • Model-driven app page loads
  • Unified Interface outbound requests
  • Dataverse API requests
  • Plug-in executions
  • Dataverse SDK operations
  • Exceptions
  • External dependencies called by plug-ins

An environment or tenant administrator configures the connection through the Power Platform admin centre. Microsoft currently limits this capability to tenants with paid or premium Dataverse licences.

Find slow model-driven app pages

Model-driven app page-load information is stored in the pageViews table.

A useful starting query is:

pageViews
| project
    timestamp,
    name,
    duration,
    user_Id,
    session_Id,
    appModule = tostring(customDimensions.appModule),
    entityName = tostring(customDimensions.entityName),
    formId = tostring(customDimensions.formId),
    hostType = tostring(customDimensions.hostType),
    warmLatency = toint(customDimensions.warmLatency),
    warmThroughput = toint(customDimensions.warmThroughput)
| order by duration desc

This helps identify:

  • The slowest pages
  • Forms with recurring performance problems
  • Users experiencing longer load times
  • Differences between browser, mobile and embedded clients
  • Possible network latency or throughput problems

Microsoft notes that only page loads whose duration can be measured reliably are included.

Separate network time from server time

A request can feel slow even when Dataverse processes it quickly.

Application Insights exposes network-related information such as:

  • Network latency
  • User location
  • VPN routing
  • Proxy or security inspection
  • Browser processing
  • Response size
  • Client connectivity

This can prevent unnecessary changes to plug-ins or forms when the server is not responsible for most of the delay.

Find slow plug-ins

Dataverse plug-in executions are recorded in the dependencies table with the type Plugin.

A simple query can identify the plug-ins with the highest average duration:

dependencies
| where type == "Plugin"
| summarize
    executions = count(),
    averageDuration = avg(duration),
    maximumDuration = max(duration)
    by name
| order by averageDuration desc

Plug-in telemetry can include:

  • Plug-in name and type
  • Version
  • Execution stage
  • Table
  • Step name
  • Depth
  • Duration
  • Isolation type

Look beyond the plug-in itself

A plug-in may appear slow because it is waiting for something else.

Consider a plug-in that takes eight seconds to complete. The plug-in code might perform very little processing itself but wait seven seconds for an external pricing service.

Optimising the internal code would have little effect. The architecture might instead need:

  • A shorter external timeout
  • Better error handling
  • Caching
  • Reduced payloads
  • An asynchronous pattern
  • Removal of the external call from the user’s synchronous transaction

The end-to-end transaction view is therefore more useful than looking only at the top-level plug-in duration.

Turn the evidence into an action plan

Once the bottleneck has been identified, assign it to the team that can act on it.

That is far more actionable than saying that Dynamics 365 is slow.

A practical investigation sequence

When a user reports that Dynamics 365 is slow:

  1. Define one precise, repeatable action.
  2. Record the environment, user, record and time.
  3. Reproduce the action using Live Monitor.
  4. Identify whether the delay is in client processing, network activity or a Dataverse request.
  5. Capture the activity or correlation identifier.
  6. Find the correlated operation in Application Insights.
  7. Review plug-ins, SDK calls and external dependencies.
  8. Compare the result across users and time.
  9. Assign the finding to the appropriate owner.
  10. Repeat the same test after remediation.

Final thoughts

Performance troubleshooting becomes inefficient when every team starts with an assumption.

Live Monitor and Application Insights provide a more disciplined approach.

Live Monitor shows what happened during the user’s session.

Application Insights shows how that operation behaved across the application, Dataverse and its dependencies.

Official documentation:


Tuesday, September 8, 2026

Field Service–F&O integration ends in 2027: What customers must prepare for


For many organizations, the integration between Dynamics 365 Field Service and finance and operations applications sits quietly in the background—moving work order costs, products, services and inventory transactions into the financial system.

That integration is now approaching retirement.

Microsoft Dynamics 365 Field Service settings for pricing and costing in the Project Operations integration

Field Service pricing and costing controls for the Project Operations integration. Source: Microsoft Learn.


Microsoft has confirmed that the existing Field Service integration with finance and operations applications will no longer be available after February 28, 2027.

This does not mean Field Service will stop integrating with Finance and Supply Chain Management. It means the architecture is changing.

Customers need to move towards the newer Field Service and Project Operations integration, where Project Operations provides the financial connection between field execution and finance and operations.

With roughly six months remaining, this should now be treated as an active migration project—not a future roadmap item.

What is happening to the existing integration?

Beginning with Field Service version 8.8.139.398, the Install Finance and Operations option is no longer available in environments where the integration was not already installed and configured.

Existing customers can continue using an enabled integration until its retirement date.

The current integration connects Field Service work order transactions with finance and operations through dual-write and asynchronous processing.

Depending on the transaction type, work order activity can create:

  • Item journals for inventory products
  • Expense journals for non-inventory products
  • Hour journals for services
  • Inventory and financial updates in finance and operations

This model is being replaced by an architecture centred on Project Operations.

What replaces it?

Under the new model, Field Service remains responsible for work order execution, scheduling and technician activity.

Project Operations becomes the financial interpretation layer.

AreaExisting integrationReplacement architecture
Field executionField Service work ordersField Service work orders
Financial containerFinance projects and journalsProject Operations projects and contract lines
Material consumptionWork order products create journalsMaterial Usage Logs become project journals and actuals
LabourWork order services create hour journalsApproved time entries generate project actuals
BillingProcessed through finance and operationsProject Operations prepares financial actuals and invoices before downstream posting
Finance connectionDirect Field Service integration using dual-writeProject Operations integration journals transfer approved financial data to Finance
Inventory ownershipSupply Chain Management when integration is enabledDepends on the Project Operations deployment model

A work order is linked to a Project Operations project or project task.

Estimated products and services create project estimate lines. When a technician marks an item as Used, Field Service creates a Material Usage Log. Project Operations converts that usage into project journals and, after approval, financial actuals.

Those actuals can then support project billing, margin reporting and downstream posting into Dynamics 365 Finance.

Microsoft’s intention is that technicians continue working in Field Service. Most of the change takes place behind the operational experience—but it is a significant change for solution architecture, financial processing and administration.

Why Field Service inventory is being suppressed

Customers using Field Service and finance and operations frequently encounter two possible inventory models:

  • Native Field Service inventory
  • Supply Chain Management inventory

Allowing both systems to appear authoritative creates confusion over stock levels, transfers, adjustments, returns and purchase transactions.

With the existing finance integration enabled, Supply Chain Management becomes the inventory system of record. Field Service inventory navigation and functionality—including inventory adjustments, transfers, RMAs and returns to vendor—is suppressed.

Recent Field Service releases have strengthened this behaviour by hiding Field Service inventory capabilities in environments using the finance and operations dual-write integration.

This does not mean inventory is disappearing.

It means inventory ownership is moving clearly to one system.

Under the new Field Service–Project Operations architecture:

  • Project Operations Core without Finance: Field Service remains the inventory system of record.
  • Integrated Project Operations with Finance: Finance and Supply Chain Management become the systems of record for inventory and accounting, and Field Service inventory is disabled.

The deployment model therefore needs to be an explicit architecture decision—not simply an installation choice.

This is not just a technical upgrade

The replacement package requires the legacy Field Service–finance and operations integration to be uninstalled.

That makes this a migration rather than something customers should assume will be an automatic in-place upgrade.

The financial processing model also changes.

In the existing integration, Field Service transactions generate finance and operations project journals. In the replacement model, transactions first move through Project Operations estimates, Material Usage Logs, approvals, actuals and invoicing processes.

Any customisations, integrations or reports built around the existing journals and transaction-status records must be assessed.

What customers should review now

1. Identify whether the legacy integration is enabled

Confirm which environments and legal entities currently use the integration.

Do not rely only on the presence of dual-write. Document the actual Field Service transactions flowing into finance and operations, including products, services, journals, pricing, costs and inventory.

2. Review custom dependencies

Look for plugins, Power Automate flows, integrations and reports that depend on:

  • Finance and operations transaction records
  • Item, expense or hour journals
  • Work order product posting
  • Project and subproject creation
  • Transaction status or retry processing
  • Field Service inventory tables
  • Custom billing or reconciliation logic

These dependencies might need to be redesigned around Project Operations estimates, Material Usage Logs and actuals.

3. Choose the future deployment model

Decide whether the organisation requires:

  • Field Service with Project Operations Core
  • Field Service, Project Operations, Finance and Supply Chain Management
  • Field Service with Project Operations and another ERP system

This decision determines where inventory, pricing, costing, invoicing and accounting will be controlled.

4. Validate licensing and prerequisites

Microsoft’s current setup guidance requires:

  • Field Service version 8.8.142.0 or later
  • Project Operations version 4.162.0.0 or later
  • A Project Operations licence for the user installing the integration
  • Appropriate licensing for the recurring Power Automate flow installed with the package

Even customers that do not intend to use the full Project Operations application should review the licensing requirement.

5. Test company and legal-entity alignment

The service account’s company determines the company used by the work order and its transactions.

Products, services, warehouses and related records must belong to the correct company. Transactions do not synchronise when company values are misaligned.

Multi-company organisations should give this area particular attention during testing.

6. Revisit pricing, costing and approvals

The replacement integration can use either Field Service or Project Operations to calculate prices and costs.

Customers must also decide whether Material Usage Logs should be automatically approved or reviewed before they generate financial actuals.

These are business-process decisions, not simply configuration settings.

7. Test mobile and offline scenarios

The integration installs mobile offline profiles that can override the standard Field Service profiles.

Any existing mobile customisations, offline tables, filters and technician processes should be regression tested before production rollout.

Final thoughts

The retirement of the existing Field Service–finance and operations integration is more than a connector change.

Field Service remains the operational application, but Project Operations becomes the bridge between work performed in the field and its financial outcome.

The biggest questions for customers are:

  • Which system owns inventory?
  • Where are pricing and costs calculated?
  • How will work order usage become financial actuals?
  • Which existing customisations depend on the legacy transaction model?

Organisations that answer these questions now will have time to test the new architecture properly.

Official documentation:


Sunday, August 30, 2026

Copy Opportunities in Dynamics 365 Sales: What gets copied—and what does not?


Copy opportunity in Dynamics 365 Sales. Source: Microsoft Learn.

Over the course of my career I have customized this functionality across Opportunities, Quotes and even Orders. Good to see this introduced as a standard in D365.

Repeat opportunities are common in sales.

A customer renews the same service every year. A distributor places a similar seasonal order. An existing customer starts another project with almost identical products and stakeholders.

Previously, sellers either recreated the opportunity manually or organisations developed custom cloning solutions. Dynamics 365 Sales now provides a standard Copy opportunity feature.

The feature became generally available on August 6, 2026.

How to copy an opportunity

Open an existing opportunity—or select one from the opportunity view—and choose Copy opportunity from the command bar.

Dynamics 365 creates a new opportunity for review. Products and stakeholders are added after the new opportunity is saved.

The button is available when:

  • The user has Create permission for opportunities.
  • The administrator has not disabled the feature.

What gets copied?

Category What happens
Customer details Account, primary contact and currency are copied
Opportunity details Estimated value, budget, description, purchase timeframe and ratings are copied
Products Product lines, quantities and pricing are copied after saving
Stakeholders Connections, roles and descriptions are copied after saving
Custom fields All custom fields are copied—including hidden fields and fields not present on the form

That last point deserves attention.

A hidden custom field may contain an internal classification, integration reference or information that should not carry forward to another deal. Administrators should review such fields before enabling this feature across the organisation.

What gets reset?

The copied opportunity is still treated as a new deal. Therefore:

  • Status is set to Open.
  • The business process returns to its first stage.
  • Ownership changes to the user copying the opportunity.
  • Created and modified timestamps use the current date and time.
  • Actual close date and actual revenue are cleared.
  • The competitor is cleared when copying a lost opportunity.

What does not get copied?

Dynamics 365 does not copy:

  • Activities
  • Notes and attachments
  • Quotes
  • Orders
  • Invoices
  • Timeline history

Inactive products are also excluded. Dynamics 365 records skipped products and other copy details in the timeline summary.

This means the feature copies the commercial starting point—not the complete history of the original deal.

A practical example

Suppose a customer purchases the same maintenance package every year.

The salesperson can copy last year’s opportunity, retain the customer, products, pricing and stakeholders, and then update the expected closing date and commercial details.

However, last year’s emails, meeting activities, quotation and invoice will not move to the new opportunity. This keeps the new sales cycle separate from the previous one.

What administrators should check

Before rolling this out, I recommend checking three things:

  1. Review custom fields
    Identify fields that should not automatically carry forward, particularly hidden integration, approval and reporting fields.
  2. Test automation
    The copied opportunity and its related product records are new records. Test any create-triggered plugins, workflows or Power Automate flows in a sandbox.
  3. Define seller responsibility
    Sellers should review dates, pricing, owner, forecast category, territory and other deal-specific information before saving or progressing the opportunity.

The feature is enabled by default. Administrators can hide it from:

App Settings → Lead + Opportunity management → Opportunity management → Show “Copy opportunity” button

Final thoughts

Copy Opportunity is a small but genuinely useful addition to Dynamics 365 Sales.

It reduces repetitive data entry without mixing the history of two different deals. The important part is understanding that it is not a complete clone: some information is copied, some is reset, and transactional history stays behind.

Used with the right controls, it can replace many custom opportunity-cloning requirements with standard functionality.

Official documentation: Copy an opportunity

Monday, August 24, 2026

Case Management Agent in Dynamics 365 Customer Service: Assisted vs Autonomous

Dynamics 365 Customer Service Case Management Agent comparing human-reviewed assistance with autonomous case processing

The Case Management Agent in Dynamics 365 Customer Service can automate the complete case lifecycle—from creation and updates to resolution, follow-up and closure.

The important functional decision is not simply whether to enable it. It is deciding where a customer service representative must remain in control and where the agent may act autonomously.

What is the Case Management Agent?

The Case Management Agent processes customer interactions and case information using configurable flows. Microsoft divides its capabilities into three areas:

  • Case creation and update: Creates cases from conversations and predicts or updates configured fields using available context.
  • Case resolution: Identifies intent, gathers information, uses organisational knowledge and drafts customer responses.
  • Follow-up and closure: Manages follow-up emails and closes cases when configured conditions are met.

Configure Case Management Agent – Microsoft Learn

Assisted vs autonomous processing

Capability Representative confirmation Full automation
Case creation and field updates The representative reviews suggested values before saving. The agent creates or updates the case when sufficient context is available.
Customer response The agent drafts the email; the representative reviews and sends it. The agent sends the email through the configured application user and shared mailbox.
Resolution The agent suggests a resolution for human review. The agent can resolve the case when the intent and required information are clear.
Follow-up and closure The representative reviews follow-ups and closes the case. The agent sends follow-ups and closes the case using configured rules and wait times.
Best suited for New, sensitive or complex processes. Stable, repeatable and low-risk case types.

For case resolution, Microsoft also provides Shadow mode, which predicts actions on live cases without sending emails or changing records. Disabled mode stops the agent from drafting responses.

Case resolution configuration – Microsoft Learn

Example business scenario

Consider a manufacturer receiving service emails about equipment faults.

A customer reports that a machine repeatedly stops during operation and includes the serial number. The Case Management Agent could:

  1. Create or update the case from the incoming interaction.
  2. Predict fields such as product, issue category, priority and serial number.
  3. Identify the customer’s intent and check the configured knowledge sources.
  4. Draft troubleshooting instructions or request missing information.
  5. Send follow-ups if the customer does not respond.
  6. Resolve the case or escalate it to a representative.

During an initial rollout, the business may require a representative to review every message. Once accuracy and exception handling are proven for a specific case category, that category could move to full automation.

Prerequisites to consider

The exact prerequisites depend on the capabilities being enabled. The documented requirements include:

  • Enable AI agents for the environment in Power Platform admin center.
  • An active Azure subscription and the required administrator or customer-service roles.
  • Consumption-based billing where the underlying agent capability requires pay-as-you-go usage.
  • Customer Intent Agent for intent-based case resolution.
  • AI form-fill assistance and automatic record-creation rules for relevant creation scenarios.
  • Configured channels, authenticated chat, workstreams, queues and voice transcription where applicable.
  • An application user and shared mailbox for fully autonomous case resolution and outbound communication.
  • Dataverse auditing and suitable permissions so AI-generated updates can be reviewed.

Case creation and update prerequisites – Microsoft Learn

Important functional decisions

Before configuration, agree on:

  • Which case types and lines of business the agent may process.
  • Which fields the agent can predict or update.
  • Whether AI updates may overwrite fields edited by a representative.
  • Which intents, knowledge sources and email templates are approved.
  • What triggers case resolution and follow-up.
  • The number and timing of follow-up emails.
  • Supported communication languages and fallback behaviour.
  • When the agent must escalate to a representative.
  • How supervisors will monitor agent actions, exceptions and feedback.

The overwrite decision is especially important. Microsoft allows administrators to decide whether autonomous updates may replace values previously entered by a representative.

How should it be tested?

Start with a limited line of business and representative confirmation.

Validate:

  • Case creation only occurs when sufficient context is available.
  • Predicted fields are accurate, including lookup values.
  • Intent classification and knowledge grounding are reliable.
  • Email tone, templates and language are appropriate.
  • Missing information produces the correct clarification request.
  • Negative, unclear and unsupported requests are escalated.
  • Follow-up rules, wait periods and closure conditions work as expected.
  • Audit history and supervisor monitoring provide enough traceability.

Microsoft provides simulations for field prediction, resolution and follow-up scenarios. Depending on the capability, simulations can use selected organisational records or an Excel file and can process up to 100 records. Simulations and Shadow mode consume Copilot or AI credits.

Agent Feed and Agent Supervisor views can help supervisors review agent actions, communications, processing status, fallback reasons and escalations.

Configure autonomous agent monitoring – Microsoft Learn

Recommended rollout approach

  1. Define: Select one high-volume, low-risk case category.
  2. Simulate: Test historical and controlled sample cases.
  3. Observe: Use representative confirmation or Shadow mode.
  4. Measure: Review prediction accuracy, response quality, escalations and credit consumption.
  5. Automate: Enable full automation only for proven scenarios.
  6. Expand: Add further case categories gradually.

Frequently asked questions

Can the Case Management Agent create cases automatically?

Yes. It can create cases from supported conversations when enough context exists to populate the configured fields. It can also update cases using conversation or incoming-email context.

Does fully autonomous processing require a shared mailbox?

A dedicated application user and shared mailbox are required for fully autonomous case resolution and automated outbound emails.

Can the agent overwrite changes made by a representative?

Yes, but only when the administrator enables the option that permits autonomous updates to overwrite human edits. This should be agreed and tested carefully.

How are follow-ups triggered?

Follow-up can be triggered by customer-email context or a configured case status reason. Rules also define conditions, follow-up count, wait times and templates.

Is every capability generally available?

No. Availability and preview status vary by capability and region. For example, simulations and Shadow mode are documented as preview features, and autonomous follow-up has specific preview terms. Check Microsoft Learn before production deployment.

Final takeaway

The Case Management Agent is not a single automation switch. It is a set of configurable capabilities covering the case lifecycle.

For most organisations, the safest approach is to begin with representative confirmation, prove the rules and data quality, monitor results, and then grant full autonomy only to predictable, low-risk scenarios.

Automation provides speed. Clear functional boundaries provide control.

Responsible AI FAQ for AI agents – Microsoft Learn

The Case Management Agent in Dynamics 365 Customer Service can automate the complete case lifecycle—from creation and updates to resolution, follow-up and closure.

The important functional decision is not simply whether to enable it. It is deciding where a customer service representative must remain in control and where the agent may act autonomously.

What is the Case Management Agent?

The Case Management Agent processes customer interactions and case information using configurable flows. Microsoft divides its capabilities into three areas:

  • Case creation and update: Creates cases from conversations and predicts or updates configured fields using available context.
  • Case resolution: Identifies intent, gathers information, uses organisational knowledge and drafts customer responses.
  • Follow-up and closure: Manages follow-up emails and closes cases when configured conditions are met.

Configure Case Management Agent – Microsoft Learn

Assisted vs autonomous processing

Capability Representative confirmation Full automation
Case creation and field updates The representative reviews suggested values before saving. The agent creates or updates the case when sufficient context is available.
Customer response The agent drafts the email; the representative reviews and sends it. The agent sends the email through the configured application user and shared mailbox.
Resolution The agent suggests a resolution for human review. The agent can resolve the case when the intent and required information are clear.
Follow-up and closure The representative reviews follow-ups and closes the case. The agent sends follow-ups and closes the case using configured rules and wait times.
Best suited for New, sensitive or complex processes. Stable, repeatable and low-risk case types.

For case resolution, Microsoft also provides Shadow mode, which predicts actions on live cases without sending emails or changing records. Disabled mode stops the agent from drafting responses.

Case resolution configuration – Microsoft Learn

Example business scenario

Consider a manufacturer receiving service emails about equipment faults.

A customer reports that a machine repeatedly stops during operation and includes the serial number. The Case Management Agent could:

  1. Create or update the case from the incoming interaction.
  2. Predict fields such as product, issue category, priority and serial number.
  3. Identify the customer’s intent and check the configured knowledge sources.
  4. Draft troubleshooting instructions or request missing information.
  5. Send follow-ups if the customer does not respond.
  6. Resolve the case or escalate it to a representative.

During an initial rollout, the business may require a representative to review every message. Once accuracy and exception handling are proven for a specific case category, that category could move to full automation.

Prerequisites to consider

The exact prerequisites depend on the capabilities being enabled. The documented requirements include:

  • Enable AI agents for the environment in Power Platform admin center.
  • An active Azure subscription and the required administrator or customer-service roles.
  • Consumption-based billing where the underlying agent capability requires pay-as-you-go usage.
  • Customer Intent Agent for intent-based case resolution.
  • AI form-fill assistance and automatic record-creation rules for relevant creation scenarios.
  • Configured channels, authenticated chat, workstreams, queues and voice transcription where applicable.
  • An application user and shared mailbox for fully autonomous case resolution and outbound communication.
  • Dataverse auditing and suitable permissions so AI-generated updates can be reviewed.

Case creation and update prerequisites – Microsoft Learn

Important functional decisions

Before configuration, agree on:

  • Which case types and lines of business the agent may process.
  • Which fields the agent can predict or update.
  • Whether AI updates may overwrite fields edited by a representative.
  • Which intents, knowledge sources and email templates are approved.
  • What triggers case resolution and follow-up.
  • The number and timing of follow-up emails.
  • Supported communication languages and fallback behaviour.
  • When the agent must escalate to a representative.
  • How supervisors will monitor agent actions, exceptions and feedback.

The overwrite decision is especially important. Microsoft allows administrators to decide whether autonomous updates may replace values previously entered by a representative.

How should it be tested?

Start with a limited line of business and representative confirmation.

Validate:

  • Case creation only occurs when sufficient context is available.
  • Predicted fields are accurate, including lookup values.
  • Intent classification and knowledge grounding are reliable.
  • Email tone, templates and language are appropriate.
  • Missing information produces the correct clarification request.
  • Negative, unclear and unsupported requests are escalated.
  • Follow-up rules, wait periods and closure conditions work as expected.
  • Audit history and supervisor monitoring provide enough traceability.

Microsoft provides simulations for field prediction, resolution and follow-up scenarios. Depending on the capability, simulations can use selected organisational records or an Excel file and can process up to 100 records. Simulations and Shadow mode consume Copilot or AI credits.

Agent Feed and Agent Supervisor views can help supervisors review agent actions, communications, processing status, fallback reasons and escalations.

Configure autonomous agent monitoring – Microsoft Learn

Recommended rollout approach

  1. Define: Select one high-volume, low-risk case category.
  2. Simulate: Test historical and controlled sample cases.
  3. Observe: Use representative confirmation or Shadow mode.
  4. Measure: Review prediction accuracy, response quality, escalations and credit consumption.
  5. Automate: Enable full automation only for proven scenarios.
  6. Expand: Add further case categories gradually.

Frequently asked questions

Can the Case Management Agent create cases automatically?

Yes. It can create cases from supported conversations when enough context exists to populate the configured fields. It can also update cases using conversation or incoming-email context.

Does fully autonomous processing require a shared mailbox?

A dedicated application user and shared mailbox are required for fully autonomous case resolution and automated outbound emails.

Can the agent overwrite changes made by a representative?

Yes, but only when the administrator enables the option that permits autonomous updates to overwrite human edits. This should be agreed and tested carefully.

How are follow-ups triggered?

Follow-up can be triggered by customer-email context or a configured case status reason. Rules also define conditions, follow-up count, wait times and templates.

Is every capability generally available?

No. Availability and preview status vary by capability and region. For example, simulations and Shadow mode are documented as preview features, and autonomous follow-up has specific preview terms. Check Microsoft Learn before production deployment.

Final takeaway

The Case Management Agent is not a single automation switch. It is a set of configurable capabilities covering the case lifecycle.

For most organisations, the safest approach is to begin with representative confirmation, prove the rules and data quality, monitor results, and then grant full autonomy only to predictable, low-risk scenarios.

Automation provides speed. Clear functional boundaries provide control.

Responsible AI FAQ for AI agents – Microsoft Learn


Sunday, August 16, 2026

Sales Qualification Agent in Dynamics 365 Sales: Research-Only vs Research and Engage

AI sales qualification agent researching incoming leads and handing a qualified lead to a seller

The Sales Qualification Agent helps organisations process large volumes of leads by researching prospects, evaluating suitability and supporting lead handover.

It operates in two modes: Research-only and Research and engage. Although they share several capabilities, the level of automation is significantly different.

What is the Sales Qualification Agent?

The agent selects leads using configured conditions such as lead source, rating or geography.

It can research the lead and their company, evaluate suitability against a target customer profile and prepare relevant insights for sellers. Microsoft positions it as a productivity tool that assists seller judgement rather than replacing it.

Sales Qualification Agent overview – Microsoft Learn

Research-only vs Research and engage

CapabilityResearch-onlyResearch and engage
Research leadsYesYes
Evaluate target customer profileYesYes
Generate an outreach emailYesYes
Send the outreach emailNoYes
Evaluate BANT criteriaNoYes
Analyse customer responsesNoYes
Send follow-up emailsNoYes
Hand leads to sellersYesYes
Notify supervisors about disqualified leadsYesYes

The key difference is control.

In Research-only mode, the agent completes the research and generates an outreach email. The seller reviews the insights and decides whether to send the email.

In Research and engage mode, the agent can contact the lead, respond to questions, send follow-ups and assess buying intent before handing the lead to a seller. It can also use BANT—Budget, Authority, Need and Timeline—as part of the evaluation.

Example business scenario

Consider a manufacturing company receiving hundreds of leads from announcing an event.

The business could configure the agent to process leads where:

  • Lead source is event
  • Rating is Hot or Warm
  • Industry is Retail
  • The contact holds a decision-making role
  • The company meets the required size or revenue criteria

With Research-only mode, sellers receive researched information and a prepared email.

With Research and engage mode, the agent can send the email, continue the conversation and hand the lead over when the configured customer-fit and purchase-intent conditions are met.

Important functional decisions

Before configuring the agent, the business should agree on:

  • Which leads the agent should process
  • What defines the target customer profile
  • Which BANT questions should be considered
  • What qualifies a lead for seller handover
  • When a lead may be disqualified
  • How leads should be distributed across sellers or teams
  • Which knowledge sources the agent may use
  • The approved email tone, signature and outreach instructions

Microsoft’s configuration process includes lead-selection criteria, customer-profile rules, assignment rules, email instructions and knowledge sources.

Configuration guidance – Microsoft Learn

Prerequisites to consider

The documented prerequisites include:

  • Dynamics 365 Sales administrator access
  • Copilot Studio licensing and capacity
  • The modern Sales Hub interface
  • Required data-policy permissions
  • Server-side synchronization with Exchange - required for research and engage mode
  • In-app notifications for seller and supervisor handovers

Custom model-driven apps must also include the relevant agent views and access to Dynamics 365 AI Hub.

How should it be tested?

Start in a sandbox using controlled test leads and test email addresses.

Microsoft recommends testing leads that match and do not match the selection criteria, together with high-, medium- and low-fit customer profiles.

Validate:

  • Whether the correct leads are selected
  • Accuracy of research insights
  • Relevance and tone of outreach emails
  • Positive, negative and unclear customer responses
  • Handover to the correct seller or team
  • Lead disqualification and supervisor review
  • References from configured knowledge sources

Testing guidance – Microsoft Learn

One important limitation

An organisation can deploy only one mode.

Research-only can later be upgraded to Research and engage, but Microsoft does not support downgrading it back to Research-only. The engagement design should therefore be tested carefully before upgrading.

Upgrade guidance – Microsoft Learn

Final takeaway

Research-only is suitable when sellers must retain control over customer communication.

Research and engage is appropriate when the organisation is comfortable allowing the agent to conduct initial outreach, manage follow-ups and evaluate purchase intent.

The technology can automate the work, but the result still depends on clearly defined qualification rules, reliable knowledge sources, sensible assignment logic and proper exception handling.


Tuesday, August 11, 2026

Dynamics 365 Sales Product Relationships: Substitute vs Cross-Sell Explained

Product relationships in Dynamics 365 Sales help sellers discover alternatives and complementary products while working on opportunities, quotes, orders and invoices. The most common confusion is between Substitute and Cross-sell—and whether selecting a substitute automatically replaces the original product.

Quick answer: A substitute is an alternative to the original product, while a cross-sell is an additional related product. In the standard Dynamics 365 Sales experience, both appear as suggestions. Selecting a substitute adds it to the transaction; it does not automatically remove or replace the original line.

What are product relationships?

Dynamics 365 Sales supports four relationship types: Accessory, Cross-sell, Substitute and Up-sell. Microsoft describes these relationships as suggestions shown to sellers during opportunity or order management. A relationship can be created for a product or product bundle, but not for a product family. See Microsoft Learn: Define related products.

Substitute vs cross-sell vs up-sell vs accessory

Relationship Functional meaning Example Expected seller action
Substitute An alternative when the original product is unavailable or unsuitable. Filter Model B instead of discontinued Filter Model A. Add the substitute and remove the original if replacement is intended.
Cross-sell A related product sold in addition to the selected product. Add a maintenance kit with a machine. Keep the original and add the related product.
Up-sell A higher-value alternative to the selected product. Offer a premium machine model instead of the standard model. Discuss the higher-value option with the customer.
Accessory A supporting item used with the main product. Add a mounting bracket for the selected equipment. Add the accessory when required.

It also supports relationship direction. Cross-sell and Substitute can be unidirectional or bidirectional, while Accessory and Up-sell are unidirectional. This matters when deciding whether Product A should suggest Product B only, or whether each product should suggest the other.

How to configure product relationships

  1. Open the Sales Hub app.
  2. Select Change area and open App Settings.
  3. Under Product Catalog, select Families and products.
  4. Open the product for which suggestions should be configured.
  5. Open the Related tab and select Product Relationships.
  6. Select New Product Relationship.
  7. Select the related product, relationship type and direction.
  8. Save and close the relationship.

The product being configured can be in Draft, Active or Under Revision state.

How sellers use Suggestions

On an opportunity

  1. Open the opportunity and go to the product grid.
  2. Select the existing product.
  3. Select Suggestions.
  4. Choose one or more related products and select OK.

On a quote, order or invoice

  1. Open the transaction and locate the Products section.
  2. Select a product and choose More commands > Suggestions.
  3. Select the related products to add and select OK.

The process is the same for quotes, orders and invoices. See Add products to quotes, orders or invoices.

Why does a substitute not replace the original product?

This is standard behaviour. Microsoft’s documented action is to select related products from the Suggestions pane and add them to the transaction. The relationship classifies the recommendation; it does not execute replacement logic.

Therefore, if the seller intends to replace Product A with Product B, the functional process is:

  1. Add Product B from Suggestions.
  2. Confirm its unit, quantity, price and other line details.
  3. Remove Product A manually.

If the business requires one-click replacement, that would be a custom solution—for example, a command that creates the substitute line, copies approved values and removes the original only after validation. Ensure that the design also account for quantities, pricing, discounts, bundles, tax, inventory, integrations and approvals.

Practical functional example

Assume a spare-parts business sells Pump Model A.

  • Pump Model B is configured as a bidirectional substitute because either model can serve as the alternative.
  • Maintenance Kit is configured as a cross-sell because it is sold in addition to the pump.
  • Premium Pump Model C is configured as a unidirectional up-sell from Model A.
  • Mounting Bracket is configured as a unidirectional accessory.

When Model A is selected, the seller can review all four options in Suggestions and decide what matches the customer’s need. Dynamics 365 assists the decision but does not make it on the seller’s behalf.

Frequently asked questions

Does Substitute automatically replace a product?

No. It appears as a suggestion and is added when selected. The original line must be removed separately in the standard experience.

Can relationships be defined on product families?

No. Microsoft states that related products can be added to a product or product bundle, but not to product families.

Where are product relationships stored in Dataverse?

They are represented by the Product Relationship (ProductSubstitute) table, which stores the relationship type between two products. See Product catalog tables.

D365 Sales Product Relationships vs F&O

If your organization uses both Dynamics 365 Sales and Dynamics 365 Supply Chain Management, an obvious question arises: If substitute, cross-sell or alternative products are already maintained in F&O, can Dynamics 365 Sales automatically use those relationships?

The short answer is: Not out of the box.

Dynamics 365 F&O has its own concepts for alternative products, cross-selling and up-selling. However, Microsoft does not currently provide a standard Dual-write map that automatically converts F&O product relationships into Dynamics 365 Sales Product Relationships..

Product relationships in Dynamics 365 Sales: Substitute, Cross-sell, Up-sell and Accessory

Have you implemented product relationships in your Dynamics 365 Sales solution? Share your experience or questions in the comments.


Wednesday, July 15, 2026

How to sort a view by multiple columns (user personal view)

A system view can be sorted by multiple columns and published. However the user is stuck with this, unless you know this trick. Read on!

Consider you are on the Accounts list and you want to sort the list based on Address 1: City first and then by the Account Name field.
  • Click on Address 1: City header column and sort based on your preference (A-Z or Z-A).
  • Now hold the Shift key on the keyboard and then click on the Account Name header column and sort based on your preference.
  • If you want to add another column to this list, continue holding the Shift key and click on the 3rd column header and sort it.
Hope this helps!

How to enable In-App Notification in Dynamics 365 CE

In-app notifications allow Dynamics 365 users to receive contextual messages directly within a model-driven app such as Dynamics 365 Sales, Customer Service, or Field Service.

In-App notifications in Dynamics 365
Notifications can appear as:

  • Toast notifications on the right side of the application.

  • Notification centre messages accessed through the bell icon.

Notifications remain in the notification centre until the user dismisses them or they expire. The default expiry period is 14 days, although this can be changed when the notification is created.

How to Enable In-App Notifications

The feature must be enabled separately for each model-driven app.

  1. Go to make.powerapps.com.

  2. Open the solution containing the model-driven app.

  3. Select the app and choose Edit.

  4. Open Settings.

  5. Select Features.

  6. Enable In-app notifications.

  7. Save and publish the app.

The notification setting is stored at the individual model-driven app level.

How Notifications Are Created

Notifications can be generated using:

  • Power Automate.

  • JavaScript or the Dataverse Web API.

  • A plug-in or custom integration.

  • The Dataverse SendAppNotification action.

  • Direct creation of records in the Notification table.

Notifications created through SendAppNotification are stored in the Dataverse Notification table, with the logical name appnotification.

Required Security Privileges

There are 4 tables to keep in mind so notifications work smoothly.

  • Notification (appnotification): This is where notifications are stored.

  • Model-Driven App User Setting (appusersetting): The table stores app-specific settings and preferences for each user.
  • Setting Definition (settingdefinition): This table contains the definition of notification-related settings that the model-driven app reads. The user needs Read and Append To privileges because the Model-driven App User Setting record references the relevant Setting Definition record.
  • Send In-App Notification (prvSendAppNotification): To send notifications to others.

Assign the following Privileges


Notification

  • Create, Read and Delete
  • The close or cross button deletes the individual appnotification record. Without Delete access, users may see the close button but be unable to dismiss individual notifications.
  • You may give User, BU or ORG level depending on the access you want to assign.

Model-driven App User Setting

  • Create, Read, Write and Append.

  • These are ORG level access.


Setting Definition

  • Read and Append To

  • These are ORG level access.


Send In-App Notification

  • ORG level access under Miscellaneous privileges tab.

These privileges allow the notification bell, notification centre and user notification settings to work correctly.

To sse “Dismiss All”, the user requires:

  • Model-driven App User Setting

  • Setting Definition

Dismiss All does not immediately delete every notification record. It updates the user setting so that older notifications are no longer retrieved.

Hope this helps!

Thursday, February 19, 2026

Field Service pricing vs ERP pricing: How to turn off the Clash

In Dynamics 365 Field Service, pricing and cost can be calculated by Field Service itself (using features like price lists, products, services, agreement pricing, etc. within Field Service). However if you'd like, you can always disable it.

This happened in one of our environments that a solution dependency was created. When I looked, there was a solution installed with the name: msdyn_FieldServiceDisablePricingComponents

I tried looking at sources from where I can download and install this solution. However, this simple setting in Field Service solves it.

When people say “install the Field Service Disable Pricing Components solution”, they’re usually referring to a built-in capability controlled by Field Service Settings, not a separate managed solution you import into Dataverse.

The practical outcome:
  • Field Service stops calculating price and/or cost
  • Another system becomes the source of truth (e.g., Project Operations, Finance & Operations, or an ERP)

Prerequisites


Before you change settings, make sure you have:
  • Administrator rights to the Power Platform environment (System Administrator / Field Service Admin equivalent).
  • Dynamics 365 Field Service installed in the environment.
  • Access to the Field Service app and the Settings area.

Step-by-step: Disable pricing components


Step 1: Sign in
  • Open the browser.
  • Sign in to your Dynamics 365 Field Service instance.

Step 2: Open Field Service Settings
  • Go to the Field Service app.
  • In the sitemap (left navigation), switch to Settings (typically near the bottom).
  • Under General, select Field Service Settings.

Step 3: Change Work Order / Booking pricing options
  • Open the Work Order / Booking tab.
  • Update these settings:
    • Calculate Price = No
    • Calculate Cost = No
  • Select Save & Close.
That’s it—Field Service will stop calculating those values internally.

Tuesday, January 20, 2026

Find what’s hiding a field in Dynamics 365: Step-by-Step with PowerApps Live Monitor

A Little Background


A field (msdyn_customergroupid / Customer Group) exists in Dataverse for the Account table, but it is not showing on the Account form in a Dynamics 365 model-driven app. Our requirement was to show this on the form and I know that we had made it visible on the Account form.

However, after a deployment we noticed that it wasn't the case. Now it could be because on various reasons:
  • The field is hidden on the form level.
  • Column security profile was implemented.
  • There is a business rule, due to which it was hidden.
  • There is a script, due to which the field was hidden.


Our Approach


The easiest way to rule out the problem is to start with the simplest reason and work your way up.

Step 1 - To check if field was hidden on the form


We checked if the field was hidden on the form? It wasn't. That was easy.

Now, to check Business Rules and Script was a hard road for us because we had 20+ rules and many functions written on form load.

Step 2 - Run quick form-runtime checks (console logic)


We used simple client checks to classify the problem.
This is the fastest way to know whether you’re dealing with design-time vs runtime.
Click F12 > Console and run these commands:

Xrm.Page.getControl("msdyn_customergroupid")
If the call returns null, the field is not on the form. For us, tt returned the Control means something must be hiding it.

Xrm.Page.getControl("msdyn_customergroupid").getVisible()
If it returns a control, something must be hiding it. We ran the below command to confirm:
It returned FALSE.

Step 3 - Use PowerApps Live monitor to capture the visibility change


When I opened the PowerApps Live Monitor and performed the steps within the App, I captured a Live monitor event:
  • dataSource: Forms.FormChecker.ControlStateChange
  • controlName: msdyn_customergroupid
  • visible before: true
  • visible after: false

And the call stack included:
  • M.setVisible(...)
  • pbl_c3f86e4e73b7ed1183ff6045bd8c93df(...)
  • Mscrm.BusinessRulesScript.Initialize(...)


Key Finding:


The field was initially visible, then explicitly hidden at runtime by a business rule script.
This pattern indicates the visibility change came from a Business Rule (Power Apps compiles business rules into runtime scripts, commonly visible as pbl_<guid> style functions).

So we could say with confidence:

✅ A Business Rule running on the Account form hid Customer Group by calling setVisible(false).
✅ Not JavaScript web resources. Not security. Not form XML missing. Not personalization.
✅ Focused our attention to look at all the business rules and we could find the culprit.

Hope this helps!