Showing posts with label Customer Engagement. Show all posts

Wednesday, September 27, 2023

Unable to update Order Product using Workflows in D365 CE

Here is a note for y'all, something to keep in mind when working with workflows in Dynamics 365 Customer Engagement (D365 CE).

You can create a workflow (i.e., initiate a workflow) on the following tables:
  • Opportunity Product
  • Quote Product
  • Order Product
But when you add a step to Update record within the workflow, you'll notice that you cannot update the above mentioned tables (entities). You can however update any of the related tables linked with these tables.

Add Price List Items too into the above mix. Can create a workflow based on this table, but cannot update Price List Item record using a workflow step.

I believe the workaround would be to use Power Automate flows instead of Workflows. I haven't tried this as yet, but I believe it is possible.

Hope it helps!

Thursday, August 17, 2023

Dual-Write | Unable to create Order from Quote in D365 CE Sales

While converting a Quote into an Order in D365 CE Sales, I was receiving an error message that went like:

Dual Write core application error-Dual Write core application error-Unable to write to Finance and Operations apps due to following error(s): {"Write failed for entity CDS sales order lines V2 with unknown exception - Inventory dimension Site is mandatory and must consequently be specified.\nUpdate has been canceled."} Please rectify your data and try again. If issue persists after multiple retries, please contact your system administrator.

Since dual write is seamless integration and data synchronization across D365CE and D365FO and as the default shipping site and warehouse is required while creating the Order in F&O, we need to ensure that the value is populated prior to creating the Sakes Order. 

Solution

While encountering an error can be frustrating, the good news is that there is a solution.

In this case, the remedy involves performing relationship mapping between the Quote and Order entities. Relationship mapping essentially defines how data is transferred between related entities.

Steps:

  • Open the solution in D365 Sales App. Ensure you've added the following components:
    • Quote and Order tables
    • 1:N relationship between Quote and Order
  • Open the relationship and click on Relationship Mapping
  • Add a new Map and select Default Shipping Site and Default Shipping Warehouse.
  • Now try to convert the Quote into an Order.
It should be smooth sailing now.

Hope that helps!

Tuesday, March 28, 2023

How to register for ClickDimensions (D365 CE)

ClickDimenions is a marketing automation tool for Dynamics 365 Customer Engagement (CRM). Tool wouldn't be the right terminology as it is a very comprehensive application to address all your marketing needs.

While the online help and guides provided by ClickDimensions are very detailed, I thought to summarize this in below few steps to register and install the app in your environment.

Step 1

Select the data center region and deployment type. The data center region must be the same or closest to your D365 CE data center region.


Step 2

Select the authentication method. You can check out the various authentication methods in this article from ClickDimensions (Register for ClickDimensions).

The contact email that you enter here is the email where the installation files / solution will be sent to.


Step 3

You will be asked to login and authenticate the app to access in the environment.

Step 4

Once the app access is provided, a notification is sent to ClickDimensions and they will generate the solution file and share it with the person mentioned in the Contact Email of the registration.

Step 5

Download the solution and import into D365 using the Power Apps Maker at https://make.powerapps.com.

Tuesday, March 21, 2023

Microsoft Dynamics 365 Customer Engagement releases versions

Here is the list of all the release versions up until version 9.1 https://support.microsoft.com/en-us/kb/2925359

For the latest Microsoft Dynamics 365 release notes, visit Released Versions of Dynamics 365 for Customer Engagement here: https://learn.microsoft.com/en-us/dynamics365/released-versions/Microsoft-Dataverse#all-version-availability

Sunday, April 24, 2022

Power Automate: How to format a date column in Create HTML Table

I had recently written a post on how to populate the lookup value instead of the GUID in Power Automate. You can refer to the same blog post by clicking here.

I had formatted the Created On field too using the same steps as mentioned in that post.

Unit next time!

Wednesday, April 20, 2022

Power Automate: How to add a space between words in header row of Create HTML Table action

 When you add Create HTML Table action step in Power Automate , you can select to add custom columns as headers. When you enter the column names, you will notice that you cannot add a space as shown below. Strange but true.


Even if you go into Peek Code section of the step, you cannot edit it there.

After spending sometime looking for it on the internet, I found that you need to enter a special character that represents a space character. Here are the 2 steps:

  • Place the cursor between Created & On.
  • Ensure that your NumLock is switch on.
  • Hold down the Alt key and enter 32 using the numpad on your keyboard.
  • That will add a space between the 2 words.

I know, I hear you sigh :)

Unit next time!

Sunday, April 17, 2022

Power Automate: How to get the value of a lookup column in Create HTML Table action

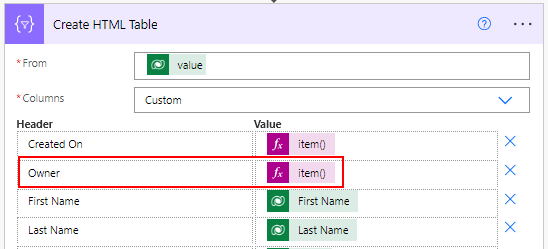
In the below table, I wanted to show the name of the Owner. But if you add the Owner (Value) column directly using dynamic content, you know that it shows the GUID instead of the name. So here is what you need to do.

HTML Output using Power Automate

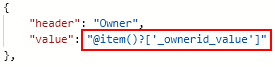
You need to enter the content as an expression and append the value @OData.Community.Display.V1.FormattedValue after the column name. Here is how the expression will look (without the " quotes) "item()?['_ownerid_value@OData.Community.Display.V1.FormattedValue']", and the value is going to look like a function as shown below.

Create HTML Table action step in Power Automate

So, the question is how do you build this expression for the Owner column or any other field (column) in Dynamics 365 CE (Customer Engagement)?

  • Let the Owner (Value) Dynamic content be selected.
  • Click the 3 dots next to Create HTML Table.
  • Select Peek Code.
  • You'll see the value as item()?['_<FieldName>_value']
Note: The <FieldName> may be any lookup field name too.

Lookup value using Power Automate
  • Copy this value in a notepad.
  • Append the value as mentioned above so the whole value looks item()?['_<FieldName>_value@OData.Community.Display.V1.FormattedValue']
  • Copy this in the Expression section and click OK.
Note: This works if the you're using a Dataverse connector. It doesn't work if your connector is Dynamics 365 connector. This happened to me. I was using the List records (Dynamics 365) connector and how much ever I tried the above expression, it still would show the GUID. I then changed the connector to Dataverse and used the List rows (Dataverse) action step instead to fetch the records, and the same expression worked.

Until next time!

Wednesday, September 8, 2021

D365 CE: How to send email without using Send Email step in workflows

Use Create Email step instead.

Here are the steps with screenshots below.

  1. Add Step > Create Record > Select Email record.
  2. Edit your email content / body.
  3. Add another step, Change Record Status > Pending Send.
  4. Add another step, Update Email > Set No. of Delivery Attempts to 0.


Now that you know how to do it, here are a few reasons why you might want to go this way instead of using Send Email.

  • You might want to attach documents to the email prior to sending.
  • You might want to update the email content based on some logic.
These cannot be done directly on Send Email step. This is another option.

Sunday, September 1, 2019

Contains Data action using Microsoft Flow

A lot has changed in the way Dynamics 365 workflows are created and this is the first of many posts to follow. One of the most common actions that we perform on using Workflows in Dynamics 365 for Customer Engagement is to check a condition, if a record field "Contains Data" or "Does Not Contain Data", which is not available when you create the workflow using Microsoft Flow.

So the question arises, is this even possible? Yes, it is. This is how you do it - step by step.


  1. Create a Built-in Condition step.
  2. Add your dynamics field (like "Created On"), in the "Choose a Value" box.
  3. Select the option "is equal to" in the next box.
  4. In the last box "Choose a Value", select Expression
  5. Type "null" in the fx (function) box, and select OK.
  6. In the "If no" branch, perform your "contains data" action.
  7. In the "If yes" branch, perform your "does not contain data" action.


Leave your comments down below, if you found this helpful. Share the post within your social family. Appreciate your support.