- CRM implementation happens in various stages.
- Before we go any further we first need to discuss the scope of the project and it's objectives. This is a very high level scope, something that management envisions and aspires to achieve by implementing a CRM solution.
- This is further detailed into business requirements. These requirements are specific to departments or various teams that will be using CRM. Each may have broad understanding of the requirements or some may even be very specific. It is also important to understand at this level, what is currently being followed in terms of your internal processes and what part of the process is required to be implemented on CRM.
- Once the above is clear, there are various project stages:
- Requirements Phase
- The requirements (we just spoke about in the previous point) is to be documented into a Business Requirement Document (BRD).
- This is converted to a Functional Requirement Document (FRD).
- Solutioning and Design Phase
- Gap/Fit document: One of the documents to produce during this phase is the gap/fit document. This will outline any gaps in the solution being implemented and it is also good to identify the efforts that will go into delivering it.
- This is then further detailed into the Functional Design Document (FDD).
- and Technical Design Document (TDD).
- Development and Environment Preparation
- The above documents are handed over to the technical team to start working on the solution.
- In parallel the infra team can also work on setting up various environments required like Development, SAT and Production Environments. Install / provision the Application.
- Configure the application and workflows and if it is bespoke then there is a level of customization too.
- Internal Testing
- Data cleansing and data formatting.
- Importing the data.
- Testing the system.
- CRP stage or Conference Room Pilot / Class Room Pilot
- This is when the client will be demo'ed the application with the customized requirements. In most cases this must be a 70-80 % fit based on customer requirements. Expect some changes, few more insights and specific requirements during this stage of the project.
- Once those gaps are also filled, the product is demo'ed again with the fixes and we move into user acceptance.
- User Acceptance Test
- This is when the key users will test the product.
- If all went well, the we move into training.
- In parallel a user guide documentation will also be worked upon before the training.
- Training and Go Live
- Administrator training
- User Training
- The training is usually provided by the key users to all the other users. We insist customer's key users to takes this up which will give them a better grip over the product.
- And finally go-live
This Dynamics 365 CE blog is all about offering you insights and solutions on Customer Engagement, Power Automate, PowerApps, and Dataverse. Stay ahead of the curve with our actionable advice and unlock the full potential of Dynamics 365 CE for your business.
Monday, May 23, 2022
D365 CE: How long does a CRM implementation take or what are the various project stages
Tuesday, May 17, 2022
Auto number sequence number skipped in Dynamics 365 CE / CRM
While testing auto-number functionality in one of our project, we noticed that the auto-number sequence skips, in case of an exception or error while creating the record.
For example: If the previous record sequence number was 1001, the next record sequence number must be 1002. However, if there was an exception while creating the record, the record isn't created in this case. Now if the user creates another record (without exception), the record sequence number would show 1003 (instead of 1002), as that number would have been skipped.
After going through Microsoft's documentation we understood why this happens, as it is clearly mentioned that the number is incremented before the record creation is started and not after the record has been created.
You can access Microsoft's documentation by clicking here.
Hope that helps!
Monday, May 9, 2022
How to enable modern advanced find in model-driven apps: Dynamics 365 CE (CRM)
I recently came across this new feature to enable modern advanced find in model-driven apps. Thought to share with you all.
Note: When you enable the feature, the advanced find button that you usually see on the bar top right will be gone. There will be changes in the way you access and modify personal views. If you're ready to enable this for your organization, keep reading forward.
Old Experience:
New Experience (No advanced find icon):
Steps to enable modern advanced find in Dynamics 365 CE (CRM)
Following are the steps:
- Go to Power Platform Admin Center
- Click on Environments.
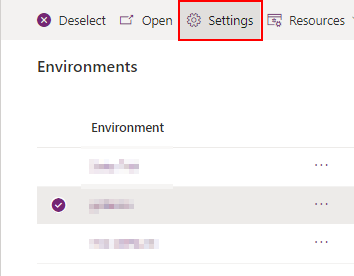
- Select the environment and click Settings.
- Expand Product and click on Features.
Access modern advanced find in Dynamics 365 CE (CRM)
Click this and you will see a flyout option from the right where you can select the entity (table). Click Continue and you'll have the option to edit filters.
Now you ask, how to manage personal views? Click on the View chevron icon. This will dropdown a list of views (both system and personal) configured. Personal views are shown with a person icon. To create, set default or delete personal views, click on Manage and share views.
Sunday, April 24, 2022
Power Automate: How to format a date column in Create HTML Table
I had recently written a post on how to populate the lookup value instead of the GUID in Power Automate. You can refer to the same blog post by clicking here.
I had formatted the Created On field too using the same steps as mentioned in that post.
Unit next time!
Wednesday, April 20, 2022
Power Automate: How to add a space between words in header row of Create HTML Table action
When you add Create HTML Table action step in Power Automate , you can select to add custom columns as headers. When you enter the column names, you will notice that you cannot add a space as shown below. Strange but true.
Even if you go into Peek Code section of the step, you cannot edit it there.
After spending sometime looking for it on the internet, I found that you need to enter a special character that represents a space character. Here are the 2 steps:
- Place the cursor between Created & On.
- Ensure that your NumLock is switch on.
- Hold down the Alt key and enter 32 using the numpad on your keyboard.
- That will add a space between the 2 words.
Sunday, April 17, 2022
Power Automate: How to get the value of a lookup column in Create HTML Table action
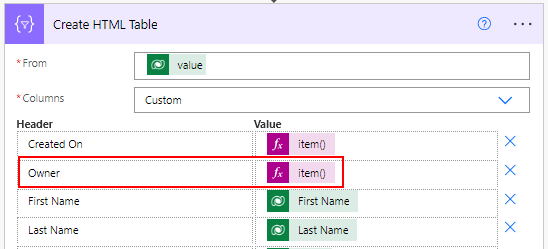
You need to enter the content as an expression and append the value @OData.Community.Display.V1.FormattedValue after the column name. Here is how the expression will look (without the " quotes) "item()?['_ownerid_value@OData.Community.Display.V1.FormattedValue']", and the value is going to look like a function as shown below.
So, the question is how do you build this expression for the Owner column or any other field (column) in Dynamics 365 CE (Customer Engagement)?
- Let the Owner (Value) Dynamic content be selected.
- Click the 3 dots next to Create HTML Table.
- Select Peek Code.
- You'll see the value as item()?['_<FieldName>_value']
- Copy this value in a notepad.
- Append the value as mentioned above so the whole value looks item()?['_<FieldName>_value@OData.Community.Display.V1.FormattedValue']
- Copy this in the Expression section and click OK.


